
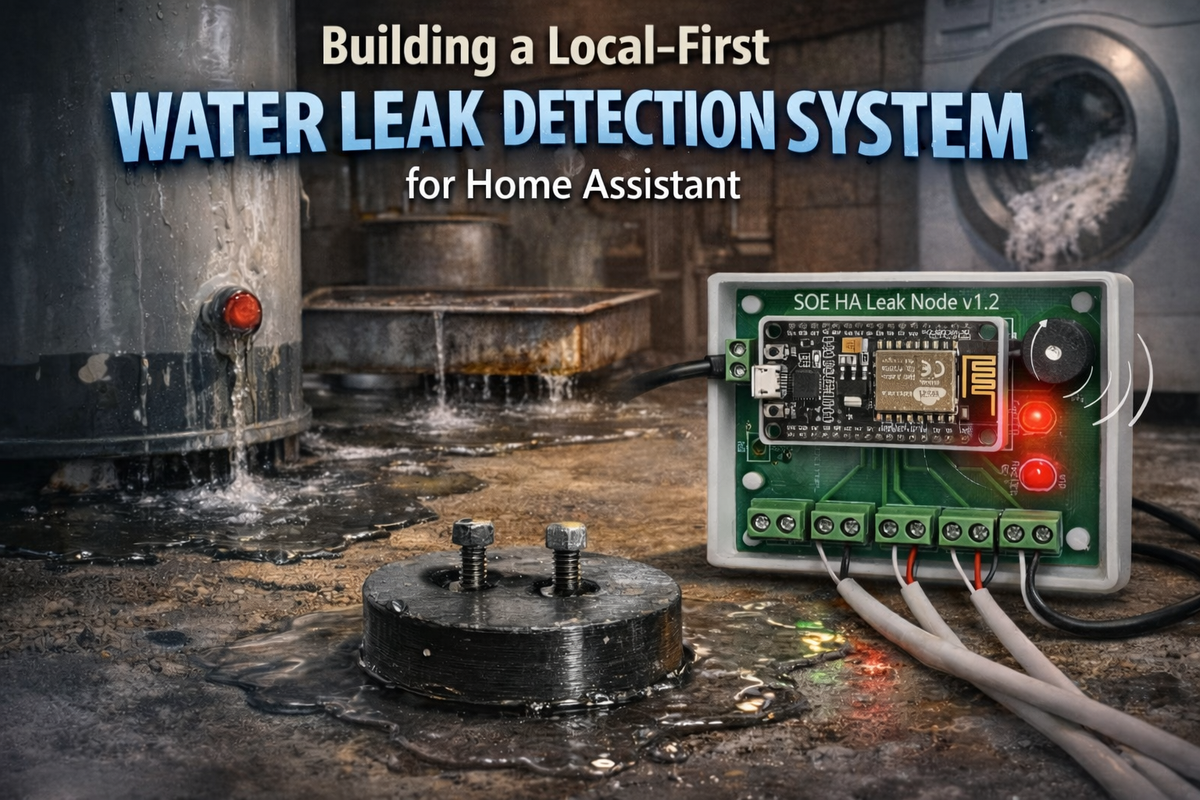
Building a Local-First Water Leak Detection System
The Problem: Four Basement Disasters I Didn't Know Were Happening
My house was built sometime in the early 1900s. Best guess is between 1910 and 1920, but no one knows for sure. It's been remodeled, expanded, and "improved" over the decades, and I'm fairly confident it didn't originally have a basement. Somewhere along the line, someone decided to dig one out anyway.
That basement has tried to destroy itself in creative ways.
Disaster #1: The Silent Water Heater
My water heater had been leaking for days before it finally gave up completely. I only discovered it when I went downstairs to investigate why we suddenly had no hot water. There was the dead heater, sitting in a puddle that had spread across a good portion of the basement floor. Days. It had been quietly leaking for days, and I had no idea.
Disaster #2: The Rusty AC Condensation Pan
Before we replaced our ancient AC unit, its condensation pan filled with rust and the drain outlet clogged solid. Water overflowed onto the basement floor, pooling in the middle of the room. We discovered this the traditional way: someone stepped on the soaking wet area rug. How long had that been accumulating? No clue.
Disaster #3: The Garbage Disposal Incident
The kids ran too much stuff down the kitchen garbage disposal, which shares a drain line with the basement washing machine. The clog formed at the 3" adapter where PVC meets cast iron at the main sewer line. Since the washing machine sits at the lowest point before the clog, guess what happened? Water - and worse - backed up all over the laundry room floor. We didn't find out until the smell made it upstairs.
Disaster #4: The Dead Sump Pump Alarm
The house came with a battery-powered float alarm in the sump well - the kind that's supposed to scream when water gets too high. Except mine never screamed. Years of sitting in a damp sump well had corroded the probe, and I'd never thought to test it. When the pump eventually failed, I found standing water pooled in the low spots of my basement floor.
The Pattern
All four disasters had something in common: they were happening in the basement, out of sight, for hours or days before anyone noticed. By the time we discovered them, the damage was done.
I needed a better system. Multiple detection points covering vulnerable areas. Something that would alert me the moment water appeared, not after it had time to spread and soak in. And ideally something local and reliable - when your basement is flooding, the last thing you want is to depend on someone else's cloud service being operational.
I'd just started experimenting with Home Assistant and had seen several projects using NodeMCU ESP8266 boards. The concept seemed straightforward: place two conductors in each vulnerable area, when water completes the circuit between them, trigger an alarm. Local control, no monthly fees, and complete visibility into what's happening downstairs.
So I built one.
Why Local-First Matters
The Cloud Dependency Problem
Most commercial smart home devices work like this: sensor detects problem → sends data to manufacturer's cloud → cloud server processes it → sends notification back to you. This chain has at least eight points of failure: your WiFi, your internet connection, DNS resolution, the cloud server, their database, their notification service, routing back through the internet, and your phone's connectivity.
If any single link fails, you don't get notified.
For enterprises with five-nines uptime guarantees and redundant connections, this architecture works fine. But home internet doesn't come with those guarantees. My residential connection has maybe 99% uptime on a good month. That's over 7 hours of potential downtime per month.
Seven hours is plenty of time for a small leak to become a major disaster.
The Local-First Alternative
The solution is simple: critical functions should work locally. Always.
My leak detection system has a 120dB piezo buzzer that screams when water is detected. This alarm runs entirely on the ESP8266 microcontroller with zero external dependencies. No WiFi required. No internet required. No cloud servers involved.
When water bridges the sensor contacts, the ESP8266 immediately:
- Turns on the red LED
- Activates the piezo buzzer
- Continues alarming until the water is gone
All of this happens locally in under 100 milliseconds.
The Home Assistant integration, mobile notifications, historical logging? Those are enhancements. Nice to have, but not required for the core safety function.
If my entire network is down, the alarm still works. If Home Assistant crashes during an update, the alarm still works. If my internet is out for three days, the alarm still works.
This is the right architecture for reliability-critical systems.
The Evolution: Breadboard to Production
November 2020: The Prototype Phase
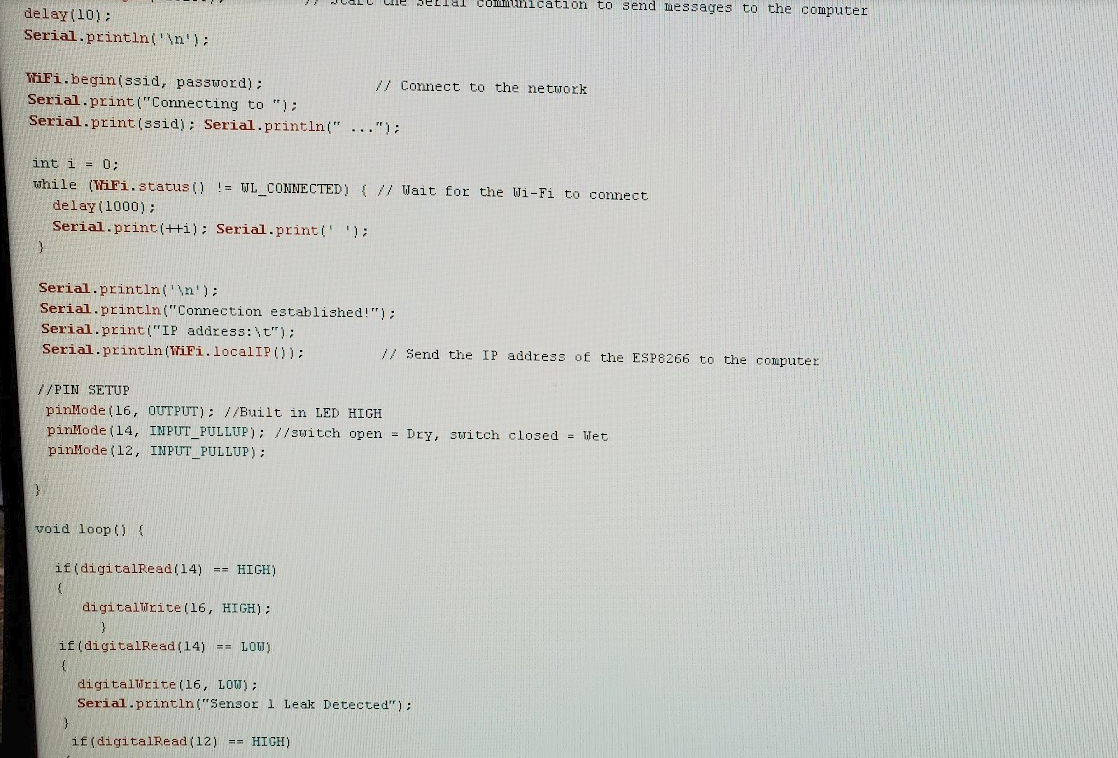
The project started on a breadboard with a NodeMCU ESP8266 development board, some screw terminals, and a handful of wires. The concept was simple: use the ESP8266's GPIO pins configured as INPUT_PULLUP to detect when water bridges two metal contacts.
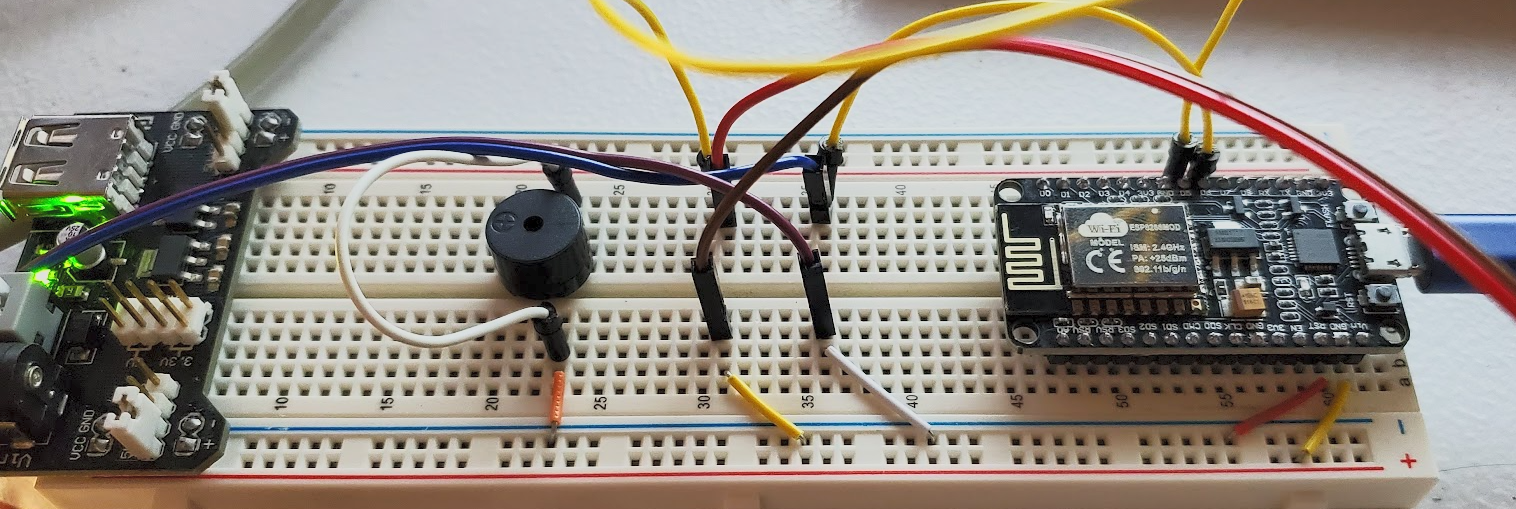
Initial breadboard (November 25, 2020): Basic proof of concept with NodeMCU, power supply module, and minimal wiring.
Working prototype (November 27, 2020): Full five-sensor array, piezo buzzer, status LEDs, and functional Arduino code. It worked, but it was a rat's nest of jumper wires that would never survive being installed behind a water heater.
December 2020: Custom PCB
By mid-December, I had moved from breadboard chaos to a proper PCB design. I'd never designed a circuit board before and wanted to try, so I used EasyEDA (this was before I learned KiCad). I sent the design off to JLCPCB for manufacturing, then bought all the components separately and hand-soldered everything myself.
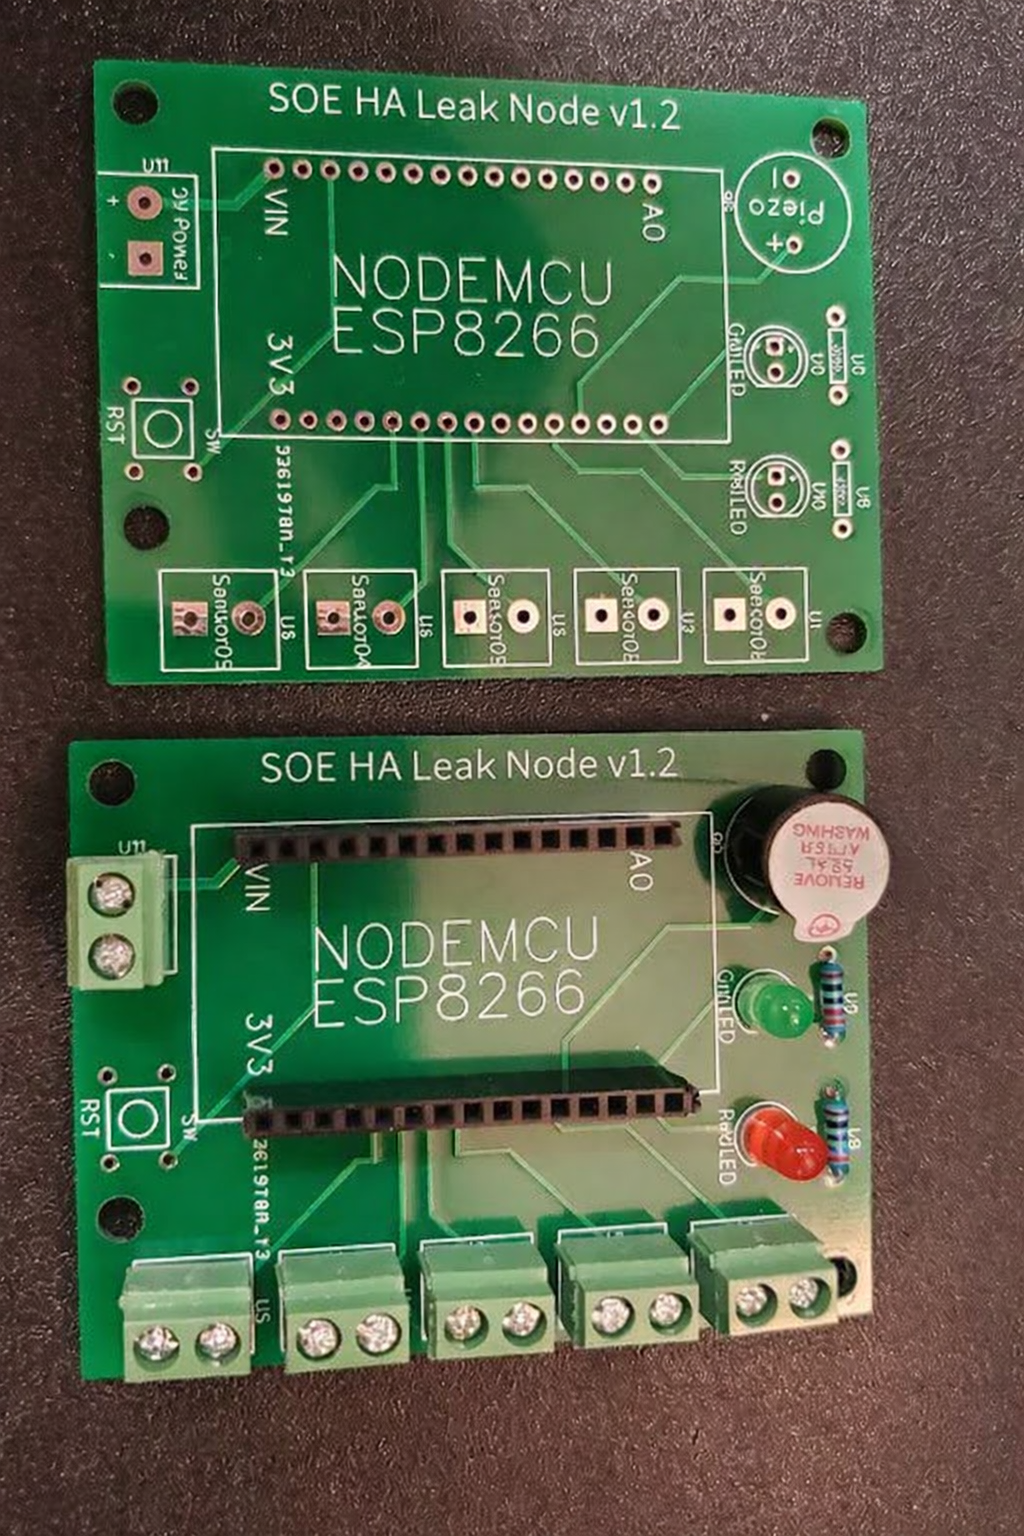
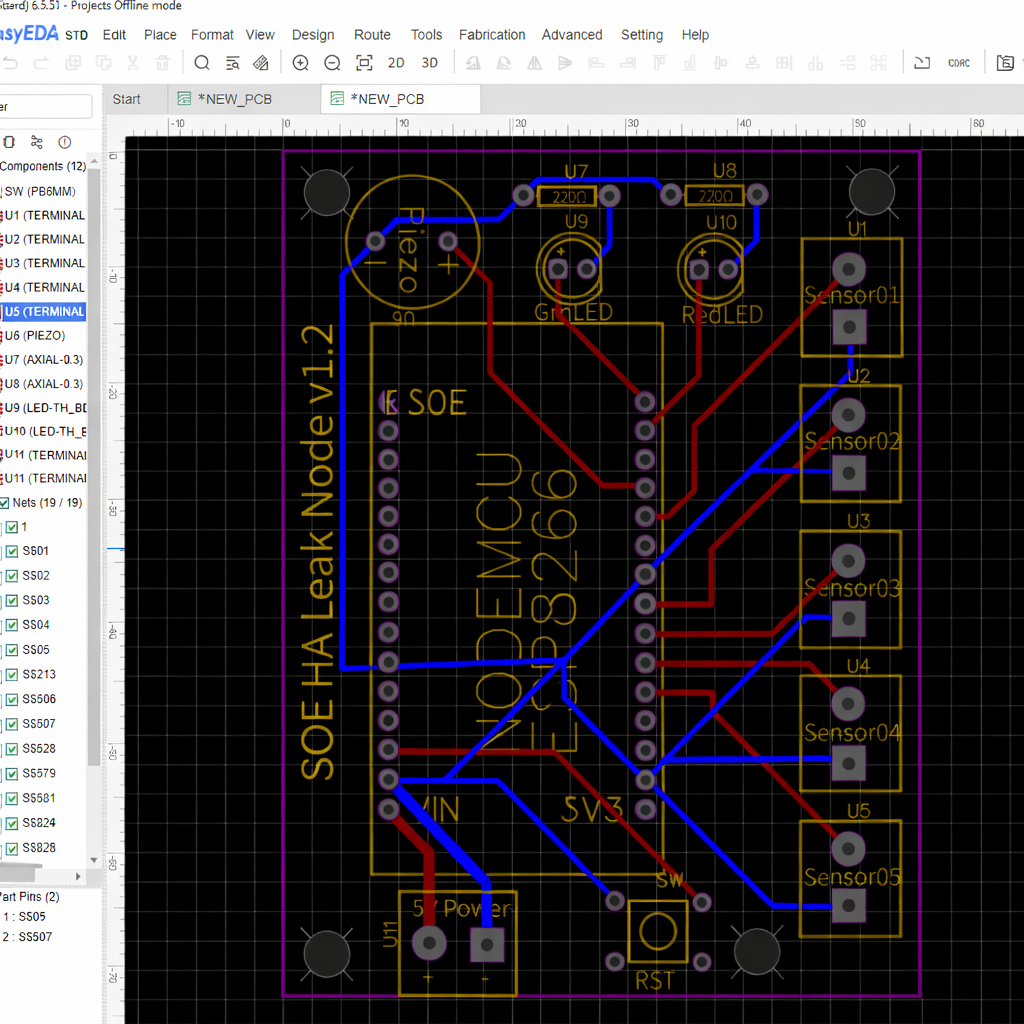
The PCB included:
- NodeMCU socket mount (not soldered directly for easy replacement)
- Five screw terminal pairs for sensor connections
- Power input terminal (5V DC)
- Green LED for normal operation
- Red LED for leak detected
- Piezo buzzer circuit
Board dimensions: approximately 220mm × 290mm. Oversized by modern standards, but it gave plenty of space for clean traces and made hand-soldering straightforward.
Total cost for five boards from JLCPCB: around $25 shipped. I only needed one but now have spares.
The Software Evolution: Arduino → ESPHome
The original firmware was native ESP8266 code written in Arduino IDE. It worked, but updating features required editing C++ code, compiling, physically accessing the device in the basement, and flashing via USB cable. Not sustainable.
ESPHome changed everything. Instead of managing WiFi reconnection logic, OTA updates, and Home Assistant integration manually with 200+ lines of C++, ESPHome handles all of that automatically with clean YAML configuration.
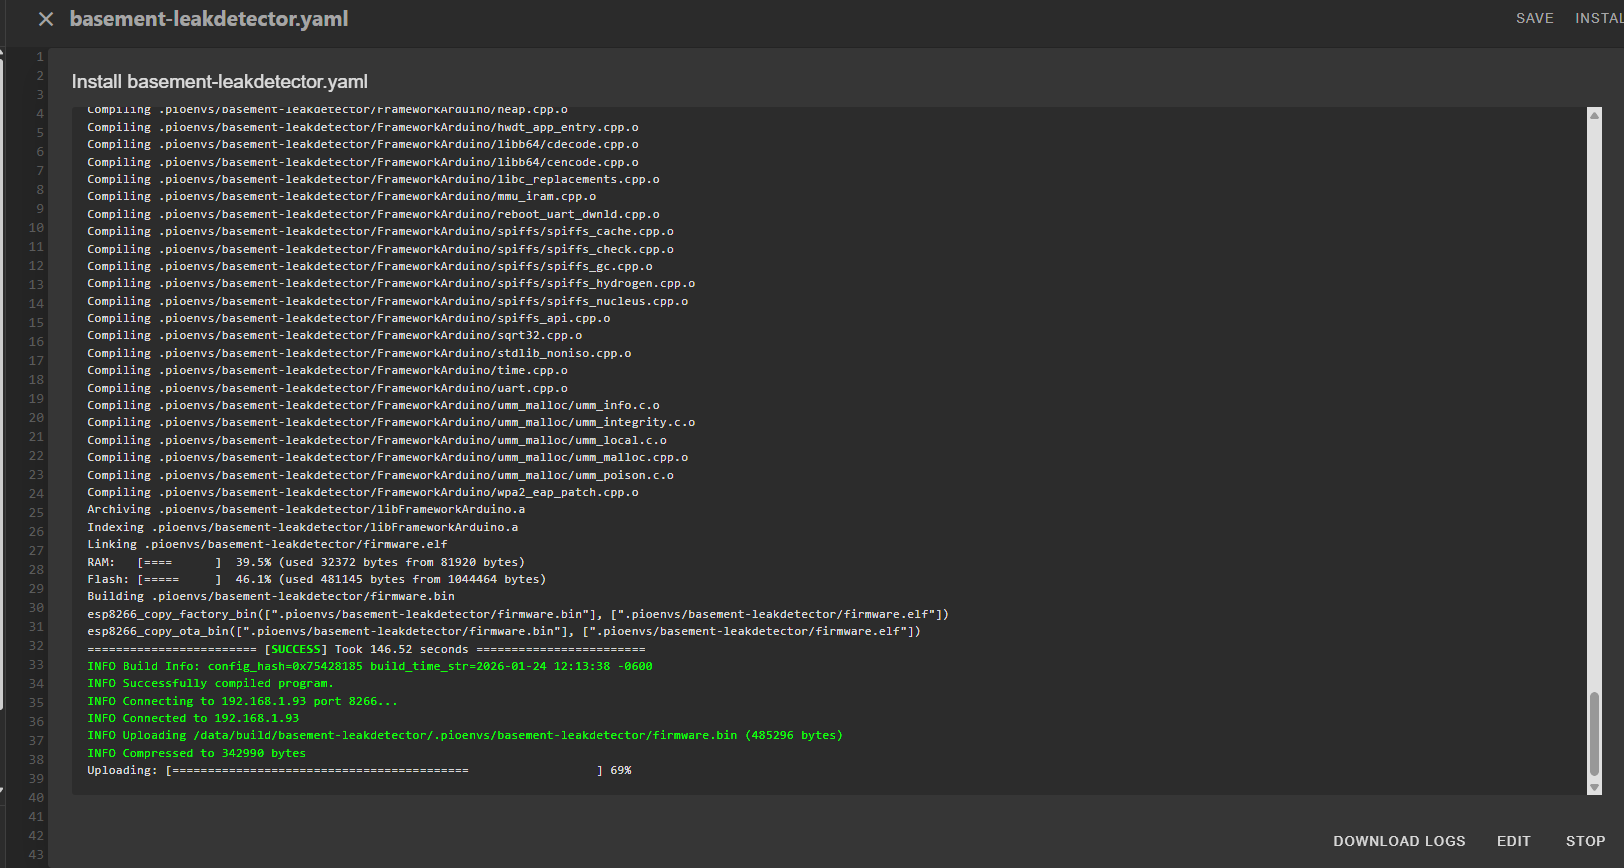
More importantly, ESPHome supports over-the-air (OTA) firmware updates. I can modify the configuration from my laptop, recompile, and push updates wirelessly. No more trips to the basement with a laptop and USB cable.
The critical part: the alarm logic runs entirely on the ESP8266 itself. When water is detected, the red LED turns on, the buzzer pulses at 0.5 second intervals, and the alarm continues until all sensors read dry. None of this requires WiFi, internet, or any external service.
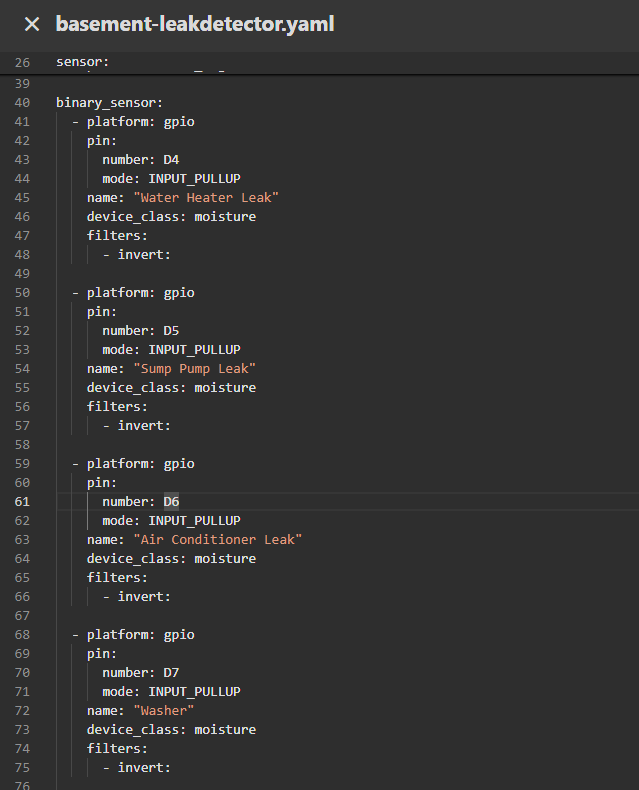
Arduino > ESPHome Yaml > Example of what pushing OTA update looks like
DIY Sensor Design
Commercial water detection probes cost $10-25 each. For what? Two metal contacts in a plastic housing.
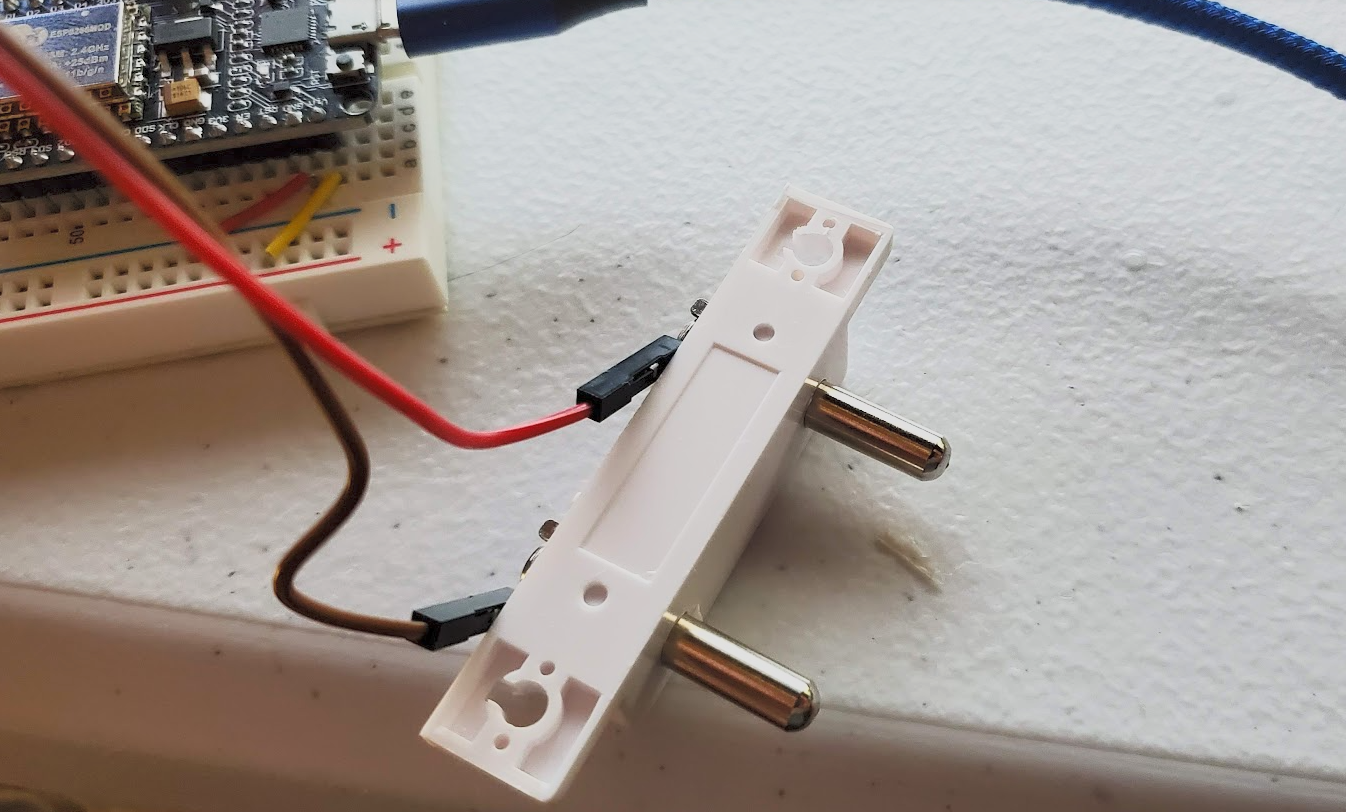
I designed a simple 3D-printable sensor puck: 35mm diameter, 15mm tall, with two holes sized for M4 or M5 stainless steel bolts.
Cost breakdown:
- Commercial probe: $10-25 each × 5 sensors = $50-125 total
- DIY approach:
- 3D printed PETG puck: ~$0.30 in filament
- Two M4 stainless steel bolts: ~$0.50
- Total per sensor: ~$0.80
- All five sensors: ~$4.00
That's a 92% cost reduction for functionally identical hardware.
Each puck prints in about 20 minutes in PETG (for moisture resistance). Assembly is literally just threading two bolts through the holes. When water bridges the gap between the bolt heads, the ESP8266 detects the short and triggers the alarm.
The sensor STL files are available in the downloads section.
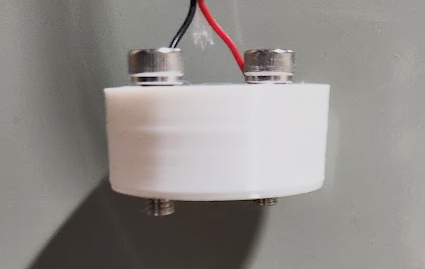
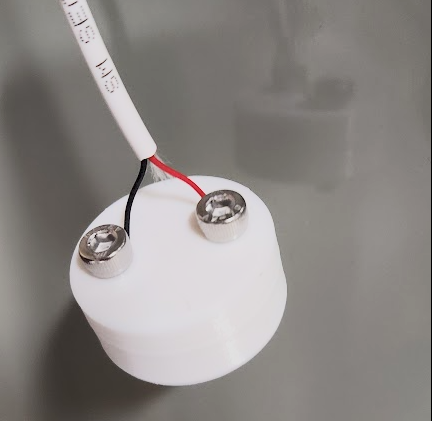
3 images of DIY sensor and last one bought from amazon. All work equally well.
Four Years of Real-World Operation
The system has been in continuous operation since December 2020 monitoring five critical areas:
- Water Heater - Sits in pan under the water heater watching for leaks or over pressure discharge
- Sump Pump - Monitors both the pit overflow
- Air Conditioning Condensate Drain - Catches condensate pump failures
- Washing Machine - Monitors supply lines and drain standpipe
Each sensor connects via two-conductor wire running back to the central PCB.
What Worked
Local alarm reliability: Zero failures in four years. The piezo buzzer has triggered exactly when it should.
ESPHome stability: OTA updates work flawlessly. The ESP8266 has never required a physical reset or reflash.
Sensor longevity: The DIY PETG + stainless steel sensors still work perfectly after four years. No corrosion, no degradation.
Cost effectiveness: ~$31 total investment for five zones of coverage vs $150-500 for equivalent commercial systems.
What Didn't Work (At First)
EMI Issues: Initial false alarms from two sources:
- Dryer static discharge: The clothes dryer next to the sump pump would cause false triggers when the air is dry and static electricity discharge happens while unloading it. I had to add 0.1µF ceramic capacitors between each GPIO input and ground to filter the noise.
- Lightning strikes: Nearby lightning caused voltage spikes on the long sensor wires. The same capacitors solved this as well.
Lesson learned: EMI filtering isn't optional for devices with long wire runs in electrically noisy environments. If I were designing Version 2.0, I'd build the capacitors directly into the PCB instead of adding them afterward.
Actual Events Caught
Sump pump failure after lightning strike: Lightning took out the sump pump. The system caught it once water reached the top of the pit, preventing what could have been a flooded basement.
AC condensate pump unplugged: After doing maintenance, I forgot to plug the condensate pump back in. Water hit the floor, alarm screamed, and I caught it before it spread beyond a tiny puddle. Plugged the pump back in, wiped up the water, damage avoided.
What I'd Do Differently (Version 2.0)
If I were redesigning this from scratch today:
Built-in EMI Filtering
The 0.1µF capacitors I added after-the-fact should be designed into the PCB from the start. No reason to learn that lesson twice.
Smaller PCB Footprint
The current 220mm × 290mm board is enormous. A redesign could easily fit in half that space with SMD components and tighter routing.
Battery Backup
Add a CR2032 coin cell with deep sleep mode. The ESP8266 could wake periodically to check sensors and only fully wake for alarms. This would provide several days of operation during power outages.
ESP32 Instead of ESP8266
The ESP32 has more GPIO pins, better WiFi performance, Bluetooth support, and costs only a dollar or two more. It would future-proof the design and allow for additional sensors or features.
Lessons Learned
Technical
EMI filtering is essential for long wire runs in electrically noisy environments. The 0.1µF capacitors weren't an optional nice-to-have; they were required for reliable operation. I should have designed them into the PCB from the start instead of soldering them on later.
Through-hole components made hand assembly much easier and enabled field repairs. SMD would have been more compact but harder to troubleshoot.
ESPHome's declarative approach is vastly superior to custom Arduino code for home automation devices. The time saved on WiFi management, OTA updates, and Home Assistant integration is enormous.
Philosophical
Local-first architecture is the only sensible approach for reliability-critical home systems. Cloud enhancements are fine as extras, but core safety functions must work without external dependencies.
Custom hardware isn't just about cost savings. It's about getting exactly what you need, understanding every component, and being able to maintain and modify the system indefinitely.
Documentation during development is worth the effort. Taking photos of each iteration and keeping notes paid off when writing this article years later.
Practical
You don't need perfection to deploy. The breadboard prototype worked. The first PCB worked. Each iteration improved things, but waiting for a "perfect" design would have meant years without leak detection.
Real-world operation reveals issues that bench testing never will. The EMI problems only became apparent after installation. The WiFi range issue only mattered in the actual basement location.
Cost transparency matters. My system cost ~$31 for five zones. Cheap smart leak detectors from Amazon (Govee, YoLink, etc.) run $20-40 each and need batteries, cloud services, and subscription fees. For five zones, that's $100-200 upfront, plus ongoing costs and cloud dependency. Mine was cheaper and I control everything.
Final Thoughts
Four years in, this system has proven itself. It's caught real leaks, survived electrical storms, handled power outages (well, except for the alarm), and required zero maintenance beyond occasional firmware updates.
The local-first approach means I never worry about cloud service shutdowns, API changes, or monthly fees. The alarm will work as long as the ESP8266 has power, regardless of what happens to the internet.
Could I have bought an off-the-shelf solution? Sure. Would it have been this cheap, this reliable, or this customizable? Probably not.
This is what "Slightly Overengineered" means: applying thoughtful complexity to solve real problems with solutions that will still work years from now.
The basement stays dry, the alarm stays loud, and I sleep better knowing it's all running locally.
Want to build your own? Use the files below to try it yourself.
Total Project Cost: ~$31
Time Investment: ~15 hours (including learning ESPHome)
Leaks Caught: 2
False Alarms After Capacitor Fix: 0
Times I've Regretted Building This: 0